Expert Advice - Competitive Prices - Dependable Quality
Expert Advice - Competitive Prices - Dependable Quality
Hardware
Why Correctly Installing Drawer Handles & Knobs Matters


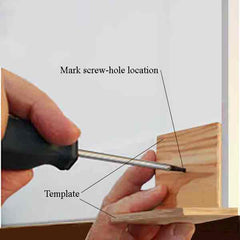
Nothing looks worse than knobs or handles which do not line-up correctly on cabinets or furniture. Correctly installing drawer pulls, cabinet handles or knobs requires lining up holes consistently at same location on doors or drawers. The simplest way to create a cohesive install is to make a template to mark placement location of screw holes.
Create a cardboard or wood template:
Knobs
Handles
Once the template is created it should be easy to locate and mark location of holes on multiple drawers or doors without having to re-measure.
If handles and knobs are-not lined up in a straight, cohesive pattern, appearance of furniture and cabinets will look be amateurish.
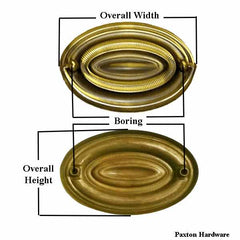
Drilling drawer pull and knob mounting holes:
Estimated Wood Screw Diameters
|
Screw Size |
Thread Diameter |
|
|
Decimal |
Approximate Fractional Measurement |
|
|
#3 |
.099" |
7/64" |
|
#4 |
.112" |
7/64" |
|
#5 |
.125" |
1/8" |
|
#6 |
.138" |
9/64" |
|
#7 |
.151" |
5/32" |
|
#8 |
.164" |
5/32" |
|
#9 |
.177" |
11/64" |
Using Eyebolts
While eyebolts will accommodate most drawer and door thickness there are occasional times where they are not long enough. Historically, when this happened, a small circular area was carved out around the screw hole. The eyebolt then does not need to be as long, as the nut is inset into the wood. This is seen on antique drawer and door interiors which were made of very thick wood or had raised panels.
Net Orders Checkout
| Item | Price | Qty | Total | |
|---|---|---|---|---|
| Subtotal |
$0.00 |
|||
| Shipping | ||||
| Total | ||||
Shipping Address
Shipping Methods
Net Orders Checkout
| Item | Price | Qty | Total | |
|---|---|---|---|---|
| Subtotal |
$0.00 |
|||
| Shipping | ||||
| Total | ||||